
Showing posts with label Converting Clothing. Show all posts
Showing posts with label Converting Clothing. Show all posts
Sunday, July 1, 2012
Friday, June 11, 2010
Zipper to Button Fly

I got these pants at the DI for my son for $2-3. I removed the belt loops and added buttons for his poor boy suspenders. I know the pants have pleats, which Pioneer men didn't have, but I really didn't feel like trying to fix that.
I realized the zipper was broken, so I decided to add a button fly. And, yes, I know those buttons are plastic inside, but I figured no one would be looking!
Tuesday, January 26, 2010
A Different Way to Cover Buttons
Liz Clark (yes, THE Elizabeth Stewart Clark) left a tip on covering buttons:
Covering buttons: cut a circle of fabric that's just more than twice the diameter of the button to be covered. Work very small gathering stitches by hand around the outside edge. Put the button in the middle, and draw the gathers up nice and firmly. Sew through the little gathered up knobby several times to anchor things well. It can then be sewn down to the dress. It's a historically accurate technique.
Ha! This way you don't have to go buy all those little metal buttons!
1. Cut your circle (a little more than 2 x the diameter of your button), work small gathering stitches near the edge of the circle.

2. Put in your button, pull up the gathers (sorry about the fuzzy picture).

3. Sew through the gathered up part.

4. Attach!

If you want more tips from Liz, see her site: http://thesewingacademy.org/index.php
2/22/12: Ashley at Make It and Love It posted some really great pictures regarding covering buttons.
Covering buttons: cut a circle of fabric that's just more than twice the diameter of the button to be covered. Work very small gathering stitches by hand around the outside edge. Put the button in the middle, and draw the gathers up nice and firmly. Sew through the little gathered up knobby several times to anchor things well. It can then be sewn down to the dress. It's a historically accurate technique.
Ha! This way you don't have to go buy all those little metal buttons!
1. Cut your circle (a little more than 2 x the diameter of your button), work small gathering stitches near the edge of the circle.
2. Put in your button, pull up the gathers (sorry about the fuzzy picture).

3. Sew through the gathered up part.

4. Attach!

If you want more tips from Liz, see her site: http://thesewingacademy.org/index.php
2/22/12: Ashley at Make It and Love It posted some really great pictures regarding covering buttons.
Wednesday, November 18, 2009
Pants with Braces


I got these slacks at the DI, cut off the belt loops, and added buttons for braces (suspenders) based on these converting clothing suggestions. I got the braces on E-Bay.
Vests

I found the men's vest at the DI and cut off the points and folded the seam up into the vest using suggestions found in converting clothing. Easy. I left the buttons because they look wooden-ish & I wanted to save a little money. The fabric is too shiny, and I've been told that in Pioneer days the back of the vest was out of the same material as the front of the vest -- not like the vests today.

I made these boys' vests using a modified pattern (McCalls 4290) with shell and wooden buttons.
Mens and Boys Shirts

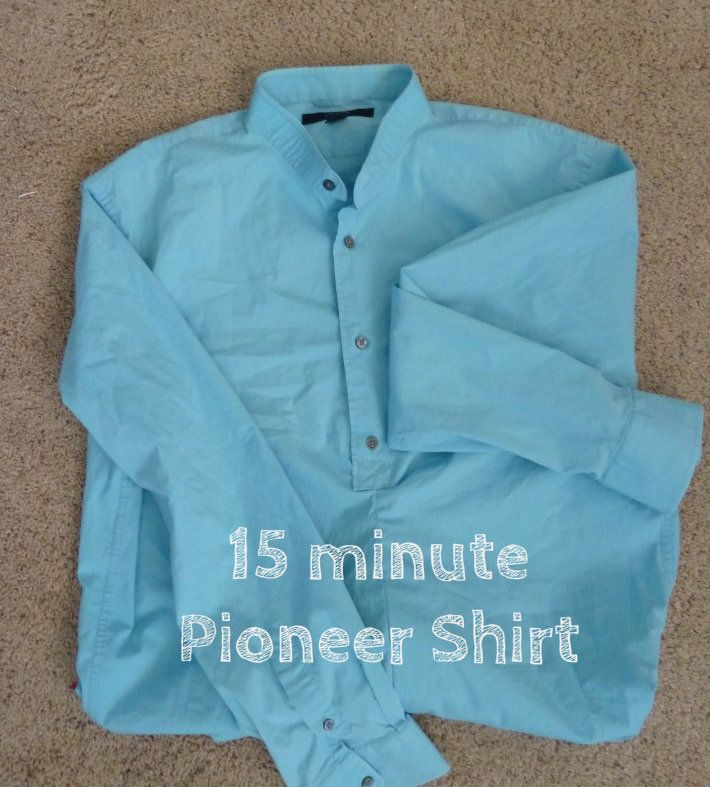
My husband doesn't share my love of Pioneer clothing, but he needed some for the Pioneer Day parade, so you can guess I made him a whole outfit for his birthday! (Just what he wanted!!) I found this men's shirt at the DI, cut off the collar and pocket, and replaced the plastic buttons with metal based on suggestions on converting clothing.

I got this shirt for my son from a neighbor who was getting rid of it. Again, I cut off the collar and pocket and replaced the plastic buttons with shell.
Monday, November 2, 2009
Tips on Converting Modern Men's Clothing to Period Costumes
Here are some tips from This Is the Place on converting modern clothing to period costumes (from 2009 training). It would, of course, be more historically accurate to build the clothing from the ground up using reproduction patterns, but this would do for many functions (trek, parades, interpreting at some spots, etc.).
****
Men's clothing hasn't changed much since 1850-1870 and is easy to alter:
****
Men's clothing hasn't changed much since 1850-1870 and is easy to alter:
- Shirts: Cut, or remove if you sew, the collars off of shirts to convert to a collarless, period looking shirt. Almost any color and pattern will work. Stripes and checks were popular in our time frame. Shirts were considered underwear, and are buttoned at the neck and were almost always topped with vests unless the men were working in the fields. For an example, click here.
- Vests: Vests had no points like the modern vests today. I open up the points and some of the bottom seam, trim the points off, leaving a seam allowance, press the seam allowance up inside the vest and topstitch it down. You can get nice vests with good fabric for a reasonable price at thrift stores and convert them to look period in much less time than it takes to construct a new one. For an example, click here.
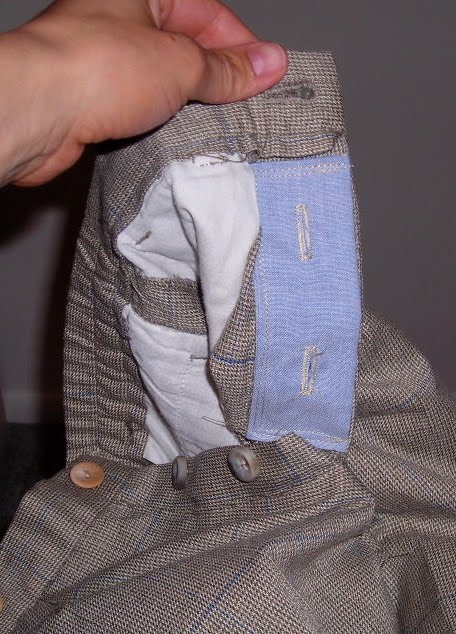
- Pants: Men's pants had no creases down the legs. Pressing the creases with white vinegar will remove them. It might be a a good idea to try it on a small area before using it on the entire garment. Remove the belt loops from modern pants and any labels sewn on the outside. It's probably best not to use pants with pleats at the top, but even that will be hidden with a vest.
- Braces (Suspenders): Braces were often straps of canvas, or other heavy fabric, crossed and sewn in the back with buttonholes on the ends to button onto the pants. There are six buttons on pants. Two in the middle of each side of the fronts and one on either side of the center back seam. Sew these on securely. They get a lot of wear and tear from the braces. For an example, click here.
- Overalls: Overalls were worn during this time period. They had buttons on them, not the metal fasteners like the ones today. You could remove the metal loop fastener, make a buttonhole in the end of the strap and use the existing buttons on the front.
- Jackets: Most modern suit jackets will work if the fabric isn't too slick looking. They were considerably baggier in the fit than the way they are worn today and not as padded in the shoulders. Frock coats were very popular. McCall's has pattern number 8701 that looks great and is very easy to sew.
- Buttons: Buttons did not have the indents around the outside edge that buttons have today. I turn them over so the back is visible and they look more period that way. Plastic buttons are OK as long as they don't LOOK plastic. Some of the plastic buttons look a lot like bone if they aren't shiny. WalMart has brass and pewter metal buttons that look exactly like the buttons I have seen on authentic period garments. There's an X in the middle of some of them instead of two or four holes. Oyster shell buttons did come into general use here in Utah until around the 1870s. They can be used if they don't have the indent around the face. Bone and antler are other options.
- Shoes: Shoes also haven't changed that much. About the only ones that aren't appropriate are modern sneakers. Any leather tie shoe will almost certainly look good.
- Hats: I found period looking hats for reasonable prices at some of the costume shops in town. Cowboy hats with the double crease are not period. They came later in the 19th Century. Straw hats were popular choices in the summer.
Subscribe to:
Comments (Atom)