Showing posts with label Buttons. Show all posts

Sunday, April 13, 2014

Buttons - More than you ever wanted to know!

There is a discussion going on at the Civilian Civil War Closet Facebook group right now about buttons. I didn't know buttons could be so, well, specific.  The graphic is from the Button Baron, I put the comments off to the side.


DD=Debra DiFranco, she said she'd share more at her Pinterest, Construction Details Page
CS=Carolann Schmidt
RJ=Rachel Jeschke

Below from Debra DiFranco

Tuesday, January 29, 2013

Covered Buttons from Metal Washers


Here are some awesome instructions on how to make covered buttons from washers from Pastoral Symphony Farm.  Thanks Mrs. G!

Tuesday, January 26, 2010

A Different Way to Cover Buttons

Liz Clark (yes, THE Elizabeth Stewart Clark) left a tip on covering buttons:

Covering buttons: cut a circle of fabric that's just more than twice the diameter of the button to be covered. Work very small gathering stitches by hand around the outside edge. Put the button in the middle, and draw the gathers up nice and firmly. Sew through the little gathered up knobby several times to anchor things well. It can then be sewn down to the dress. It's a historically accurate technique.

Ha! This way you don't have to go buy all those little metal buttons!

1. Cut your circle (a little more than 2 x the diameter of your button), work small gathering stitches near the edge of the circle.


2. Put in your button, pull up the gathers (sorry about the fuzzy picture).


3. Sew through the gathered up part.


4. Attach!


If you want more tips from Liz, see her site: http://thesewingacademy.org/index.php

2/22/12:  Ashley at Make It and Love It posted some really great pictures regarding covering buttons.

Sunday, January 10, 2010

Girls' Pink Dress

Sorry, I know I'm not like those major craft-bloggers who have multiple posts a week, but I just can't sew quite that much!

Here's the dress that my daughter "designed" for herself. She wanted a flat front, pleats, a waistband (I wanted the piping), and no growth tucks. It's pretty cute, but I really like growth tucks. I also did a 11" arm band, but should have done 10".


This is the most buttons I've ever put on a girls' dress. You're supposed to put them a maximum of 1.5 inches apart, even as close as 1 inch! Elizabeth Stewart Clark says little girls' dresses didn't have wooden buttons (they don't wash well), but that's all I had. I'll have to buy more metal buttons to have on hand. The button holes are horizontal (but it made them a bit wide that they crossed over the edge of the placket (I think that's a no-no, oops.)).
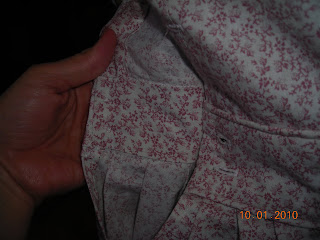

You can see how nicely the inside of the dress finishes out. You do an inner-waistband that covers up all the raw ends.

The fabric, again, was from the Bernina store in Centerville that moved to Ogden. So sad it is gone, but at least I benefited from some GREAT deals!!

LinkWithin

Related Posts with Thumbnails