Showing posts with label Tips and Tricks. Show all posts

Thursday, June 6, 2013

Better Bonnets


I decided it was time to upgrade my girls' bonnets from my fakey-made-up pattern (the free one here) to something more authentic.  Once I realized Liz Clark's slat bonnet pattern was multi-sized I thought I'd give it a go.

I started with the smallest size that said 0-1 and figured that would fit our baby.  However, I found it really is for a little baby (infant), so it was too small for us (plus my kids really do have big heads!).  But, I found a cute baby to try it on!  The Tot size (1-3) would have worked better for my needs.


Next I made one for my 3 year old using the Girl 1 (3-7) size.  She wouldn't try it on or let me take a picture.

Then, it was time to try out the Girl 2 (7-13) size for my 7 year old.  Again, it turned out great, and she even let me take pictures.


For the curtain I used this awesome rolled hem stitch that I learned from Liz at her day cap class.  It is now my favorite hand-stitching technique.  Obviously, it works great when you need a small hem, but it works wonders on curves.  Basically you work using a very small fold on the edge of the fabric stitching at the top of the fold then right below the fold (like a zig zag).  When you get several stitches in a row, you pull your thread and your hem rolls up nice and tidy.  I'm in love.


Somewhere between making bonnets, I got on Pinterest and found a bonnet that Sarah Jane at Romantic History had made that I wanted to try.  It wasn't until later I saw she had a tutorial!  That project will be my next post!!  So excited!

One reason I wanted to try her bonnet was she gave a nice little primer on types of bonnets.  

Corded bonnet (I've never made one):
  • visually attractive
  • very stiff when starched (but collapses in the rain, or wilts in humidity)
  • needs quite a bit of cording to hold up
Slat bonnet:
  • holds up well in weather (since I used thick paper in mine, I'm not sure how well that would do in the rain; ahem, I guess all the reason to cheat and just use heavy interfacing)
  • cannot be folded back to increase your view (this is what really inspired me to make a quilted bonnet.  If my kids can see better out of their bonnets, they're more likely to keep them on.)
Quilted bonnet:
  • attractive
  • stiff brim without starch
  • can be folded back
  • warmer than slat and corded bonnets


Thursday, October 27, 2011

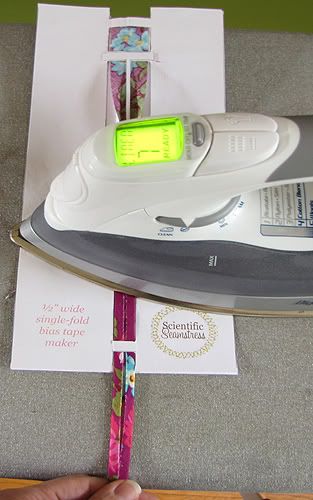
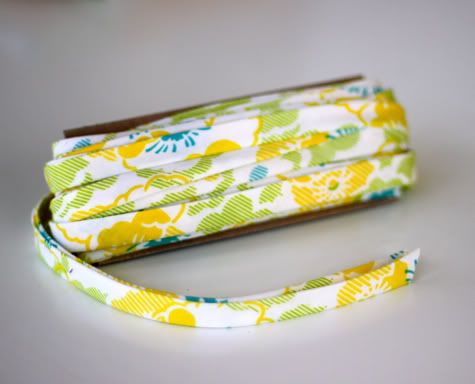
Printable Bias Tape Maker by The Scientific Seamstress

OK - this is one of the best ideas I've EVER seen.  Carla should be making money off this idea; it is FANTASTIC!

See her full post here.  But if you just want the download for the cardstock template, she has it here (.5") or here (1").

Wednesday, June 8, 2011

How to Re-Create Pioneer Looks

Here's how I've been re-creating the pioneer look lately:

1.  Look at period pictures.
2.  Look at period fabrics so you can choose the right kind, whether you purchase on-line or in a local store.
3.  Get/make a pattern.

Thursday, May 19, 2011

Bias Tape and Piping

Image from Prudent Baby
 
In my sewing I tend to use a lot of bias tape and piping, particularly to bind a neck.  I'm really liking the bias tape roll technique shown on Prudent Baby because I can start with a 10 - 12" square and end up with plenty of bias tape.  MADE also shows some additional helpful techniques and gives a review of the Simplicity Bias Tape Maker.  I'd love one of those!

To make piping, you cut your bias tape as shown in any of the links above, but rather than folding and ironing it as shown, I just fold mine in half, slide some yarn* in the center and top stitch a row using my zipper foot next to the yarn. For neck bindings I usually use 1" strips, and for bias tape that I'll pipe, I use 1 1/8 - 1 1/4" strips.

I asked Elizabeth Stewart Clark the guidelines on piping mid-century clothing.  I really just wanted a few guidelines, but she sent this wonderful information (with a few slight edits from me):


The purpose of piping:
 [Piping] acts as a "buffer zone" in high-wear portions of the garment, and also to distribute wearing stress (such as around an armscye [arm-hole]). 

How to use/make piping:
It is almost invariably done in the same fabric as the dress, and it is *small*... the pre-made stuff you can buy in packets is more than twice as large as you'll see on most mid-century dresses! I use a single strand of crochet cotton, or very fine kitchen string, or even perle cotton. If you're stitching by hand, it's easy to feel the cording; if working by machine, use a zipper foot to get right next to the cord a bit easier. Though it takes a bit more time to do, hand-basting piping in the armscye does make it easier to sew.

Accurate spots for self-fabric, tiny bias piping include:
1: Armscyes. It's used to distribute wearing stress from the back of the arm, more evenly around the entire armscye, and does help prevent the back of sleeves ripping out with movement. If you have a lot of problems with ripping, though, you need a wider back in your dress as well as piping.

2: Neckline finishes. Very tidy, and it takes up the abrasion nicely.

3: Wrist edges on coat or narrow sleeves; cuff edges on some full-gathered sleeves. Again, this is to absorb abrasion from wear. It's far easier to scrounge scraps and re-do some piping when the wrist edge wears, than to try and re-cut or re-piece an entire lower sleeve.

4: Top and bottom edges of a waistband, or bottom edge only of a waistband. (Ditto as with sleeve edges.)

5: Lower edge of non-waistband bodices, for the same reasons, plus a really nice finish to the bodice.

The place you do not see piping by the 1850s and 1860s include down the front edge of a bodice, in the side seams, in the shoulder seam joining front and back bodice, and in the tuck detail or curved seam in the back bodice.

*According to Liz, I should NOT be using YARN in my mid-century piping, I should be using something smaller!  Oops!  Something to work on next time!  Thanks, Liz! :)

I know I've seen seen some dresses (or an occasional one) with contrast piping, but I guess it wasn't that common in the day.  I got my inspiration from modern sources, I guess.  
So, this would not be a good example (see the contrast):


Whereas, this would be better (same fabric for the piping), but, still too just a little too large.

Oh well, not many will know that it's wrong, but I'll do better next time!

Wednesday, October 13, 2010

DIY Dress Form Tutorial Link

This could be very helpful...


http://samstermommy.blogspot.com/2009/08/duct-tape-dress-form-tutorial.html

If you're re-enacting, though, be sure and wear the proper undergarments to get the right fit.

If I remember correctly, this is similar to the method Liz Clark uses to design and build your own corset.

Thursday, June 17, 2010

Drafting Drawers

I've had a few people ask me for help with their pantaloons (or more correctly, drawers) for trek. Since I didn't have any of my own to loan out, I thought I'd better come up with something that I could sell them (because I don't want a whole bunch lying around here to be loaners). Since I didn't want to violate any copyrights on patterns, I thought I'd better figure out how to draft a pattern. Oh boy. This is new territory for me.

I started out with The Workwoman's Guide (Plate 7). Surprisingly the overall pattern shape/size was somewhat similar to my Butterick one. However, the curves were different (non-existent in the Workwoman), so the fit was just weird to me (plus, I didn't take into account that there would be some overlapping of the center seam, so they were extra baggy...). I knew Liz Clark has a pattern for split drawers, but I shouldn't sell what I make using her patterns, and I can't imagine trek people would be too interested in split drawers anyway.

So, I went to Google for pajama bottoms. I first found Leena.

Then I found Craft and Fabric Links for PJ bottoms.

Then I found a free shorts pattern that happened to be on graph paper.

Then I found more graph paper.

I learned a ton of stuff; it was great!

I was able to draw out different measurements on the graph paper and still have one shorts pattern helping me know I was on track!

It really turned out well. If you have graph paper and measurements, it's quite a breeze (but only if you're in split drawers.  Hehe.)!

Just remember, these drawers are NOT AUTHENTIC!  But hopefully no one will be looking up your dress to check!

I was able to help a young woman in our ward today sew her own drawers.  It was so much fun.  She sewed down the basement and I'd instruct her on each step.  Next we'll make her a Not-So-Pioneer Skirt.  It's neat helping her learn better how to sew!

Friday, June 11, 2010

Pioneer Apron Tips

Like the Workwoman said, there's a lot of variation to aprons. As I've made a few lately, here are some things I've learned.
  • Do as much of your ironing as you can at the same time: Press your pockets, your straps, the sides of your apron before you start sewing.
  • Do as much of your stitching at the same time as you can. Stitch the sides of your apron, the straps, the pockets, and run your gathering stitches across the top at the same time.

This is a front apron (and, yes, is a little long for this dress). When I saw this fabric, I hoped there would be enough for an apron! I had only a 45" square (1 1/4 yd.). Usually when you sew, you cut out your pattern so the grain runs up and down; however, I thought since this print didn't need to be torn out that way, I'd try letting the grain run side to side (raw edges at the sides rather than the top and bottom).


The apron body is 35" x 45". The pockets are 8" x 10". The straps are 29" x 2". The waistband is 22" x 3" (could have been 20").
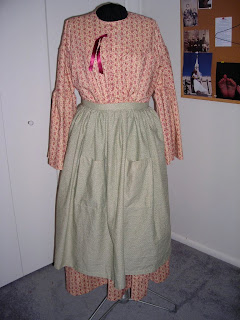

I made this apron to go about all the way around, in which typically I'd need 2 widths of fabric torn to my desired length for the body. However, since the print didn't need to go a certain direction, I thought I'd save myself 2 seams and tear it opposite the grain (raw edges at the sides rather than the top and bottom).


The apron body is 40" x 72" (35" would have been better because I had to take some off later). The pockets are 8" x 10", and the waistband is 4" x 80". This apron needed 2 1/4 yards, but there is a bit of fabric waste when you do it this way.

Straps

With a 2" strip, I tried double-folding over the top of my strap, and folding up the bottom of the strap to slide under the top folds and then stitch down (see the picture). I don't really like how it turned out, I'll just sew my strap right sides together next time and turn and press like normal.

Pockets

I like cutting (tearing) out my pockets 8" x 10". This allows me to turn under my sides 1/4" - 1/2" and the top 1" - 1 1/4".

You can either press your sides, your bottom, then your top to the back, then just stitch the top down (you'll stitch the sides down when you attach your pocket to the apron), or

you can press the top of your pocket to the front (right sides together) 1" - 1 1/4" and stitch your sides (just the 1" - 1 1/4").

Then, flip it the correct way and press your sides in as well as the bottom 1/4" - 1/2".


To place your pockets, if you have one of those big clear plastic things (sorry, I don't even know what it's called), just mark your center at the top of the apron with a pin, then place the plastic thing matched up with the top and however far you want your pocket out from the center. I placed these pockets 9" down and 5" out from my center. Seemed to be good placement. 8" down would have been fine, too. This was so much easier than using my tape measure and measuring down from the top and out from the center!


Waistband

Since this was for a front-only apron (not all the way around), I made my waistband strip 22" long x 3". Next time I might make it just 20" (or even less) long. I ran my gathering stitches at 1/4" & 1/2".

In the past I've put the waistband and the apron right sides together, stitched them, then flipped the waistband to the back, folded it under 1/4" - 1/2", then hand stitched the inside of the waistband down.

A faster way to do this is to put your waistband right side up with your apron on top, right side up also (scruntching the apron 1/2" smaller than your waistband), and stitch the two pieces together at 3/4".

Flip the waistband up and press it all flat. Press each short end in 1/2" (to match up with the width of your apron).  Then press the top edge of the waistband down so it meets the top of the apron.

Then fold the waistband over again so the raw edges are all to the inside, the top of the apron is sandwiched in the waistband, touching the top of the waistband.

Insert your straps, pin everything down, and securely top-stitch your straps in and the bottom of your waistband.

I like this method of folding the waistband into 4 equal parts with the center fold touching the top of the apron because it provides a uniformly thick waistband -- meaning the bottom of your waistband is not thicker than the to of your waistband.  It always bugs me when my waistband gets perma-creases in in it from bending over.

If you're in the mood for wasting fabric, you can also just tear a really long strip (mine was 4" x 80") that will become both you waistband and your straps together. I really liked the 4" wide band. If I were to run gathering stitches on my apron at 6/8" and 7/8", then I could sew the waistband and apron together at 1".

To place your waistband and apron together, just mark the center of your waistband, figure out how big you want the apron to be around and measure from your center out.

Again, flip the waistband up after the two pieces are stitched together, press, fold the top edge down to the top of the apron, then fold over and press again to sandwich the top of the apron. Press what has become your straps to match how you've pressed your apron. Top stitch the short ends of your strap, along the bottom of your strap, which turns into the bottom of your waistband, all the way to the other end.


I made this apron mostly using Elizabeth Stewart Clark's free apron pattern.

Wednesday, March 10, 2010

Gathering

Make It and Love It has some good tutorials on basic sewing techniques like gathering. Take a look. Also click her Sewing Tips link for more tips.

Tuesday, January 26, 2010

A Different Way to Cover Buttons

Liz Clark (yes, THE Elizabeth Stewart Clark) left a tip on covering buttons:

Covering buttons: cut a circle of fabric that's just more than twice the diameter of the button to be covered. Work very small gathering stitches by hand around the outside edge. Put the button in the middle, and draw the gathers up nice and firmly. Sew through the little gathered up knobby several times to anchor things well. It can then be sewn down to the dress. It's a historically accurate technique.

Ha! This way you don't have to go buy all those little metal buttons!

1. Cut your circle (a little more than 2 x the diameter of your button), work small gathering stitches near the edge of the circle.


2. Put in your button, pull up the gathers (sorry about the fuzzy picture).


3. Sew through the gathered up part.


4. Attach!


If you want more tips from Liz, see her site: http://thesewingacademy.org/index.php

2/22/12:  Ashley at Make It and Love It posted some really great pictures regarding covering buttons.

Monday, November 2, 2009

Tips on Converting Modern Men's Clothing to Period Costumes

Here are some tips from This Is the Place on converting modern clothing to period costumes (from 2009 training). It would, of course, be more historically accurate to build the clothing from the ground up using reproduction patterns, but this would do for many functions (trek, parades, interpreting at some spots, etc.).
****

Men's clothing hasn't changed much since 1850-1870 and is easy to alter:
  • Shirts: Cut, or remove if you sew, the collars off of shirts to convert to a collarless, period looking shirt. Almost any color and pattern will work. Stripes and checks were popular in our time frame. Shirts were considered underwear, and are buttoned at the neck and were almost always topped with vests unless the men were working in the fields. For an example, click here.
  • Vests: Vests had no points like the modern vests today. I open up the points and some of the bottom seam, trim the points off, leaving a seam allowance, press the seam allowance up inside the vest and topstitch it down. You can get nice vests with good fabric for a reasonable price at thrift stores and convert them to look period in much less time than it takes to construct a new one. For an example, click here.
  • Pants: Men's pants had no creases down the legs. Pressing the creases with white vinegar will remove them. It might be a a good idea to try it on a small area before using it on the entire garment. Remove the belt loops from modern pants and any labels sewn on the outside. It's probably best not to use pants with pleats at the top, but even that will be hidden with a vest.
  • Braces (Suspenders): Braces were often straps of canvas, or other heavy fabric, crossed and sewn in the back with buttonholes on the ends to button onto the pants. There are six buttons on pants. Two in the middle of each side of the fronts and one on either side of the center back seam. Sew these on securely. They get a lot of wear and tear from the braces. For an example, click here.
  • Overalls: Overalls were worn during this time period. They had buttons on them, not the metal fasteners like the ones today. You could remove the metal loop fastener, make a buttonhole in the end of the strap and use the existing buttons on the front.
  • Jackets: Most modern suit jackets will work if the fabric isn't too slick looking. They were considerably baggier in the fit than the way they are worn today and not as padded in the shoulders. Frock coats were very popular. McCall's has pattern number 8701 that looks great and is very easy to sew.
  • Buttons: Buttons did not have the indents around the outside edge that buttons have today. I turn them over so the back is visible and they look more period that way. Plastic buttons are OK as long as they don't LOOK plastic. Some of the plastic buttons look a lot like bone if they aren't shiny. WalMart has brass and pewter metal buttons that look exactly like the buttons I have seen on authentic period garments. There's an X in the middle of some of them instead of two or four holes. Oyster shell buttons did come into general use here in Utah until around the 1870s. They can be used if they don't have the indent around the face. Bone and antler are other options.
  • Shoes: Shoes also haven't changed that much. About the only ones that aren't appropriate are modern sneakers. Any leather tie shoe will almost certainly look good.
  • Hats: I found period looking hats for reasonable prices at some of the costume shops in town. Cowboy hats with the double crease are not period. They came later in the 19th Century. Straw hats were popular choices in the summer.

LinkWithin

Related Posts with Thumbnails