Showing posts with label Aprons/Pinafores. Show all posts

Wednesday, March 16, 2011

Toddler Pinafore

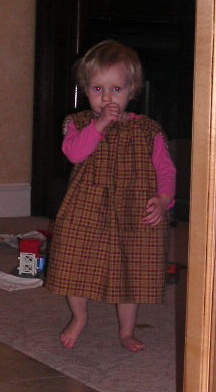
Baby needed a new pinafore this year. I used Elizabeth Stewart Clark's FREE 1-2-3 Pinafore insturctions.  I used a full strip of 45" fabric.  I was so good to line up my plaid at the side seams, then forgot to on the pockets!!  Now that's going to bug me since I could have actually done a very good job.

Baby was asleep when I needed to measure the neckline, so I guessed WAY too big.  Rather than taking the neckline all out, I fixed it by using a long needle with a large eye (my needle isn't very blunt, but a blunt needle would be good), secured a string at one end of the neck binding (on the inside) by making a few loops over each other, ran the string through the neck binding, pulled a little to scrunch the fabric (like gathering), and secured at the other end with a few more loops to tighten it up.

This project took around 2 hours.
Baby with the way to big neckline!
She won't stand still for a picture.  Got a good back shot of her running away!
Caught her off guard when she turned around!

Friday, June 11, 2010

Pioneer Apron Tips

Like the Workwoman said, there's a lot of variation to aprons. As I've made a few lately, here are some things I've learned.
  • Do as much of your ironing as you can at the same time: Press your pockets, your straps, the sides of your apron before you start sewing.
  • Do as much of your stitching at the same time as you can. Stitch the sides of your apron, the straps, the pockets, and run your gathering stitches across the top at the same time.

This is a front apron (and, yes, is a little long for this dress). When I saw this fabric, I hoped there would be enough for an apron! I had only a 45" square (1 1/4 yd.). Usually when you sew, you cut out your pattern so the grain runs up and down; however, I thought since this print didn't need to be torn out that way, I'd try letting the grain run side to side (raw edges at the sides rather than the top and bottom).


The apron body is 35" x 45". The pockets are 8" x 10". The straps are 29" x 2". The waistband is 22" x 3" (could have been 20").
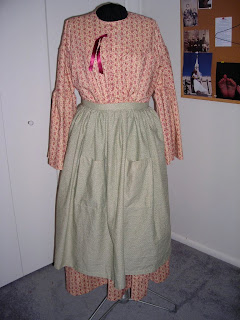

I made this apron to go about all the way around, in which typically I'd need 2 widths of fabric torn to my desired length for the body. However, since the print didn't need to go a certain direction, I thought I'd save myself 2 seams and tear it opposite the grain (raw edges at the sides rather than the top and bottom).


The apron body is 40" x 72" (35" would have been better because I had to take some off later). The pockets are 8" x 10", and the waistband is 4" x 80". This apron needed 2 1/4 yards, but there is a bit of fabric waste when you do it this way.

Straps

With a 2" strip, I tried double-folding over the top of my strap, and folding up the bottom of the strap to slide under the top folds and then stitch down (see the picture). I don't really like how it turned out, I'll just sew my strap right sides together next time and turn and press like normal.

Pockets

I like cutting (tearing) out my pockets 8" x 10". This allows me to turn under my sides 1/4" - 1/2" and the top 1" - 1 1/4".

You can either press your sides, your bottom, then your top to the back, then just stitch the top down (you'll stitch the sides down when you attach your pocket to the apron), or

you can press the top of your pocket to the front (right sides together) 1" - 1 1/4" and stitch your sides (just the 1" - 1 1/4").

Then, flip it the correct way and press your sides in as well as the bottom 1/4" - 1/2".


To place your pockets, if you have one of those big clear plastic things (sorry, I don't even know what it's called), just mark your center at the top of the apron with a pin, then place the plastic thing matched up with the top and however far you want your pocket out from the center. I placed these pockets 9" down and 5" out from my center. Seemed to be good placement. 8" down would have been fine, too. This was so much easier than using my tape measure and measuring down from the top and out from the center!


Waistband

Since this was for a front-only apron (not all the way around), I made my waistband strip 22" long x 3". Next time I might make it just 20" (or even less) long. I ran my gathering stitches at 1/4" & 1/2".

In the past I've put the waistband and the apron right sides together, stitched them, then flipped the waistband to the back, folded it under 1/4" - 1/2", then hand stitched the inside of the waistband down.

A faster way to do this is to put your waistband right side up with your apron on top, right side up also (scruntching the apron 1/2" smaller than your waistband), and stitch the two pieces together at 3/4".

Flip the waistband up and press it all flat. Press each short end in 1/2" (to match up with the width of your apron).  Then press the top edge of the waistband down so it meets the top of the apron.

Then fold the waistband over again so the raw edges are all to the inside, the top of the apron is sandwiched in the waistband, touching the top of the waistband.

Insert your straps, pin everything down, and securely top-stitch your straps in and the bottom of your waistband.

I like this method of folding the waistband into 4 equal parts with the center fold touching the top of the apron because it provides a uniformly thick waistband -- meaning the bottom of your waistband is not thicker than the to of your waistband.  It always bugs me when my waistband gets perma-creases in in it from bending over.

If you're in the mood for wasting fabric, you can also just tear a really long strip (mine was 4" x 80") that will become both you waistband and your straps together. I really liked the 4" wide band. If I were to run gathering stitches on my apron at 6/8" and 7/8", then I could sew the waistband and apron together at 1".

To place your waistband and apron together, just mark the center of your waistband, figure out how big you want the apron to be around and measure from your center out.

Again, flip the waistband up after the two pieces are stitched together, press, fold the top edge down to the top of the apron, then fold over and press again to sandwich the top of the apron. Press what has become your straps to match how you've pressed your apron. Top stitch the short ends of your strap, along the bottom of your strap, which turns into the bottom of your waistband, all the way to the other end.


I made this apron mostly using Elizabeth Stewart Clark's free apron pattern.

Thursday, June 10, 2010

Aprons

So the youth in our ward are going on trek this year. When I heard they all needed two of everything I thought those poor saps need some help! So I volunteered my limited experience (and time) to help them by loaning my stuff, making a few things, or teaching them to make items themselves.

I needed to add a couple aprons to may collection anyway, so in addition to reading over Liz Clark's info on aprons, I turned to The Workwoman's Guide to freshen up my knowledge.

The Workwoman says (page 76, and Plate 11, Images 1-16):


If for common use, aprons are made of white, brown, blue, black, or checked linen, of black stuff, calico, Holland, leather, nankeen, print, or long cloth; if for better purposes, of cambric muslin, clear, mulled, or jaconet muslin, silk, satinette, satin, &c. The length of the apron is, of course, generally determined by the height of the wearer, and the width, by that of the material, and by the purpose for which it is intended. For working aprons, the width is generally one breadth of a yard wide; for dress aprons, two breadths, one of which is cut in half, and these halfs put one on each side of the whole breadth. If the material should be wide enough, one breadth, of from fourteen to twenty nails [31.5 - 45"], will answer very well.

So, sounds like about anything goes!

A few basics from Plate 11:
A Simple Shape

This is a simple shape, and the one most in use. It is either plaited [pleated] or gathered into the band, which is about a nail deep [2.25"]. These aprons are usually worn by all servants and women while at work. Blue, check, and brown linen are most used for scouring and cleaning; white linen, Holland, and print, for less dirty employments. Ladies wear them of silk or muslin, with or without pockets.


Girls' Apron


This is a pretty apron, often worn by girls from eight to sixteen or eighteen years of age. The bib is made of the proper size to fit in front, between the shoulders of the wearer, coming down in a slope to the waist. These bibs may be plain, or they are ornamented with tucks or folds, either upright or length-wise. The shoulder-strap may be of the same material, or of tape or ribbon. The apron is gathered evenly, or plaited so as to reach to A on each side, which is situated exactly between the bottom of the bib and the shoulder-strap behind.

A Cooking Apron

This is a neat pattern for a housekeeper, cook, or kitchen-maid. The bib is quite plain, and pins to the gown at the corners. The size given in the Plate is suitable for a girl, but the bib should be cut to suit the wearer at once, and not made by guess. The apron is made of check or strong linen.

Pockets

These vary very much, some being laid on the apron as in Fig. 3, 4, and 6; others put on at the back, a slit being made in the apron to correspond with the place of the pockets. These last are made as in Fig. P, from a long double piece, which, being sewed up, is cut diagonally or crosswise, from A to B, and forms two pockets, the part cut being sewed to the slit of the apron. The whole length of the narrow piece, before it is cut, is six nails [13.5"], and the width, when double, two nails [4.5"]. The slit in the apron is neatly hemmed, and a trimming of ribbon or silk put round it, with a bow at the bottom, or a fringe and tassels.

In Fig. 3 the pocket is a piece of two nails and a half deep and five nails wide. This piece is plaited in regular folds at the top to a lining of only two nails and a half deep, and the same width. The bottom is fulled nearly to a point in small folds, and the lining, being turned in to the same shape, is sewed to it with a piping. The pocket is then stitched firmly on to the apron, and trimmed according to fancy. One or three small bows are put on the pocket.

In Fig. 4 the pocket is cut in the shape of a heart, and put plainly on the apron. It is about two nails and three-quarters wide, and two nails and a half deep. The pocket is piped or trimmed with edging.

In Fig. 6 the pocket is particularly neat and pretty, being made of folds of the same material as the apron, with a coloured piping all round it, and three bows the same colour as the piping.

My next post: Ideas on making aprons fast using modern methods.

Wednesday, March 10, 2010

Girls' Pinafore


Yesterday (and this morning) I made a new pinafore for my daughter. I already have a red one that I believe still fits, but I don't like the way it looks with her pink and white dress. I thought I'd use the dimensions from The Workwoman's Guide found on page 30, but put it together more like Elizabeth Stewart Clark recommends in her 1-2-3 Pinafore.

I made the size for a child of 6 years (although, my child is a 4-year old more the size of a 5-year old.

6 yrs.
Length 27"
Width 33.75"
Depth of arm-hole 6.18"
Piece left for shoulder 2.81"
Quantity hollowed out of neck .56"
Length of frill to each arm-hole 22.5"
Depth of frill 1.68"
Distance from top for 2nd tape 5.62"
Size of gussets 1.68" (didn't use)

I did make the neck a bit deeper at the front, 2", I believe, but left the back at the .56.

I cut my ties 1" x ??" (however long looked right). I ironed both long edges to the middle, as well as the raw short ends in 1/4", folded that in half the long way and stitched the open edge together. I like the ties in it (versus buttons) because it is very adjustable. The ties also bunch it up nicely as gathers would have (but without gathering).

I cut the pockets 4.25" wide by 5.25" high. I ironed each edge in 1/4", and pressed down the top another 1" and stitched it down. I positioned the pockets 8" down from the top, and each pocket is 1.5" out either direction from the center.

I think it took me about 3 hours, but looking at it, it looks like it should have taken 1 to 1 1/2. Must have been those ruffles. I could have just folded the fabric around the arm openings inward and stitched it down. That would have been much faster, but the ruffle is cute.

Thursday, February 11, 2010

Infants' Pinafores


I went ahead and made a pinafore for the baby using The Workwoman's Guide. The Infants' Pinafore is found on page 30 and corresponds with Plate 3, figure 18.


The book says pinafores are made out of diaper, Holland, linen, or print. Obviously, I did not use any of these. OK, I don't know what diaper or Holland is, but I don't think my fabric qualifies. I wanted a fabric that would also work for a boy.

I've made one of Elizabeth Stewart Clark's pinafores in the past, and I like her construction better than this one. However, The Workwoman provided some not-as-full measurement options in various sizes:

First Size
Length 8
Width 24.75
Depth of arm-hole 4.5
Piece left for shoulder 1.68
Quantity hollowed out of neck .56
Length of frill to each arm-hole 22.5
Depth of frill 1.125
Distance from top for 2nd tape 4.5
Size of gussets 1.125

2 yrs.
Length 22.5
Width 31.5
Depth of arm-hole 6.18
Piece left for shoulder 2.25
Quantity hollowed out of neck .56
Length of frill to each arm-hole 22.5
Depth of frill 1.125
Distance from top for 2nd tape 5.06
Size of gussets 1.125

6 yrs.
Length 27
Width 33.75
Depth of arm-hole 6.18
Piece left for shoulder 2.81
Quantity hollowed out of neck .56
Length of frill to each arm-hole 22.5
Depth of frill 1.68
Distance from top for 2nd tape 5.62
Size of gussets 1.68

The things I really didn't like with this pattern were the assembly and construction. For instance, you make the armhole without a seam down the side and just re-enforce the bottom of the slit with stitches. It's just not very pretty to me. I was also annoyed that I finished the arm hole, just to add a ruffle later. I could have just put the ruffle on, right sides together, flipped it over, and finished the inside that way. It seems like they did it this way so that they could remove frills for washing.


I also didn't really like the neckline; it was too loose, and the neck corners were ugly. However, I did run a string with knotted ends through the front to gather it up.


I have to admit my sewing wasn't very pretty on this one. Somehow I missed that my shoulders ended up being different widths when I first stitched them together. I don't like this garment well enough to go back and fix it. I also got annoyed at my frey-ey fabric. Not my most favorite project, but at least it didn't take too long.

Friday, January 29, 2010

Aprons

I had a comment on here saying that Aprons did not have pockets in this era. However, Elizabeth Stewart Clark clarified that they could be absolutely appropriate.

She has more detailed info on aprons and how to make them.

Monday, November 2, 2009

Apron

I used one of Elizabeth Stewart Clark's free apron patterns to make this apron. The fabric is wrong and the pin up part of the apron is too big, but you get the idea. The bonnet is McCalls.

Girls' Clothing


I used an old children's clothing pattern book from the DI to make the dress, then one of Elizabeth Stewart Clark's Pinafores (in the Free Patterns post) for the apron. The pantaloons and bonnet were either Simplicity or Butterick.

LinkWithin

Related Posts with Thumbnails