Showing posts with label Women. Show all posts

Friday, July 21, 2023

Trek: Leggings/yoga pants vs. drawers

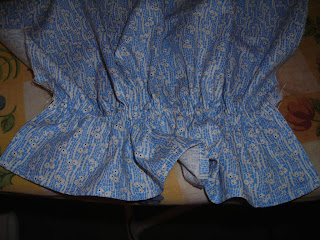
I've noticed young women typically don't want to wear "drawers" on trek to protect their legs from plants and bugs and accidental undie flashes, but prefer modern leggings/yoga pants/bike shorts. I've wondered, are the new synthetic fabrics actually as cool as 100% cotton? My guess was no, but we got to test that this year when my two daughters went on trek to Muddy Creek, Wyoming for 3 days and 2 nights.

The younger daughter only wanted leggings, so we found the thinnest ones we could at Walmart. The older daughter was willing to try a pair of drawers, but she also wanted a pair of thin leggings. 

When the girls got back, the daughter who tried both the leggings and the drawers said the drawers were definitely cooler than the leggings, and the leggings collected more dirt so she felt the drawers were cleaner. She also said the drawers helped keep her skirt from getting caught between her legs.

So there ya go: 100% cotton drawers for the win. I'm so not surprised.

(Honestly, when I've gone on trek, I've taken the drawers in case I needed the extra leg protection, but usually I haven't actually worn them; I've just worn a petticoat because it's cooler than drawers and it keeps my dress from entangling my legs.)

Thursday, April 25, 2019

Past Patterns #803 Pioneer Dress Modified

So, I tried on my old clothes to see if they will still fit for trek. Unfortunately the dress I drafted myself, is just a tad too snug to provide the comfort level I want this time around. I can get into it, I just don't want to feel squished. I'm sad because I really love that dress: the fabric is just so soft and the pattern, so pretty, but losing weight... well. I've remade the bodice three times already and the skirt is already cinched down because I originally used it for maternity, and I didn't remake it with a smaller waistband, I just ran a string through it, so I really shouldn't feel bad making something new.

I would have liked to have, as I've said before, make a corset or more likely a stay, and then draft a new bodice, but I'm going for speed right now, so I pulled out my Past Patterns #803 Pioneer Dress.  As I was working on the dress, up popped a post on the Civilian Civil War Closet by Beth T. with pictures of the original dress that this #803 was based on:


I suppose I could have used the pattern I drafted as my base, but I was a little worried about upsizing it. I've kind of wanted to use the lining patterns of #803 anyway to see how they come out as a bodice. May I say, you can also make a bodice out of the lining pattern pieces. How great is that? Two dresses in one!


After I made the bodice, I came across this lovely dress on Pinterest. It's pleated at the front of the skirt and gathered at the back, I'm pretty sure. It has bigger buttons than what I've often seen. I really loved the little shoulder ruffle.


I couldn't for sure tell if the ruffle was on a cap or stuck in a low armscye, so I messaged Liz Clark. She thought it was a cap over the sleeve. The armscye in #803 is pretty low, so I wondered if I were to stick the ruffle in there, the placement would be just about right, but I was worried it might stick straight out. I did some practice runs on my "muslin" and a little on my real thing, but between bringing the armscye up to where the original's is, my piping, my cap, and my sleeve, there was just too much fabric, my arm was a little too chubby, and I was worried about permanently messing up my armscye. So, with that, I took out my piping and kept the ruffle on my low armscye. I think it will do.


I chose to do bigger buttons like in the original. I just wish I would have made my buttonholes a little closer to the edge of the fabric. I'd originally done a waistband like in #803, but when I saw the pretty dress, I took it off and just added piping at the bottom of my bodice. I didn't account for the less bulk, so now the waist is actually a little too big, so in the picture, I'm holding about 2" to the back.

The original dress says it's cotton, but definitely a finer cotton than mine, maybe more like my blue dress. I wish I would have made my skirt a tad fuller (Sandra Ros Altman says up to 120", and I was about 10" less than that).

I still think it's pretty, and it will be a good trek dress. Looking at it on, it looks like I still could have taken the waist up a little.

I'm pretty proud of some of my hand stitching:


And I do love all those little gathers lined up so perfectly (this is all gathered in tight just for fun, I did have to loosen them, but it got them lined up really nicely):


I think my neighbors going on trek think I'm a little crazy for getting so into this, but I just really love it! This is a work of art for me. When I was sewing years ago, I could get a basic dress done in around 8 hours. I'll say this one has taken at least 20. I wasn't planning for that.

Friday, October 4, 2013

A Pennsylvania Sun Bonnet

Ann D. shared this bonnet that she found in Pennsylvania on The Civilian Civil War Closet Facebook page, and I asked if I could share/save it.  I was DELIGHTED to see that I seem to be making more authentic looking bonnets!  I love being able to see the detail of this one, especially on the inside!  It reminds me of the Godey's 1857 bonnet.  Ann is looking forward to sharing more living history/clothing construction at her blog, Household 6 Diva soon!


Friday, July 5, 2013

The Metropolitan Museum of Art Corded Sunbonnet

I thought the zoom in/out feature with my mouse scroller on this sunbonnet from The Metropolitan Museum of Art was just awesome!  Click the link to check it out!  Of course, the sunbonnet was nice, too.


Plus, there's a whole collection, too!

Thursday, October 20, 2011

Past Patterns #807: Mid-Nineteenth Century Wrapper

Here's what I came up with for my wrapper.  I don't know what happened to the color in the picture (well, my 8 y.o. took the picture, maybe that had something to do with it?).  It's kind of a blue and yellow dress, but it comes out kind of brownish/gray.  I had some other fabric on hand that was prettier, but I think I'll save it for a dress I'm really excited about.

Because I was so short on time, I didn't get to do anything too cute with this dress.  I wanted to do something cool with the sleeves, but maybe I can do that later.  I also thought a belt would be fun, but again, maybe later.  Wouldn't a collar be fun, too?  I called my mom to see if she could make me one for Christmas.

To save time, I considered just machine gathering the back, but I really, really love the look of gauging (we practiced it in our Sewing Academy), but took the less time consuming route and went with shirring (zig-zag over two heavy strings, then pull it in). 

I've put 24 buttons on this dress, but it needs one more.  I sewed them on by hand, but totally cheated and did my buttonholes by machine.

I did my first hem by hand, but realized after trying it on (in the picture) that it's too short!  Can you believe it??  I did lengthen it around an inch and a half, but my fingers hurt too much to hem it again by hand, so I just did it by machine.

It took around 8 hours, I think -- I kind of lost track after 4-5, though.

How the draw-cord looks on the inside.  I'm having troubles with it slipping, so I just stuck a safety pin in the cord to hold it in place.  You can see I didn't line the dress.

I love, love, this back.

Pregnancy, Maternity Dresses, & Wrappers

Yes, I'm pregnant, expecting, with child.  Here we go again.  I wasn't planning on needing to dress up anytime soon, but have had the opportunity.  I kind of like this dress the way it is:
and don't want to switch it back to this:
I think it would drown me right now anyway.

So, I thought I'd make something new -- in 3 days.  Yup. I'm crazy.

I promised myself I wouldn't make another dress until I made myself some proper undergarments -- i.e. a corset!  But, I'm really not wanting a maternity corset:

From A Day in 1862

However, I had Past Patterns Wrapper pattern
and knew that wrappers could be appropriate for maternity wear, but knew they were also known as an "undress" (something you don't wear out in public).  From what I understand, it's basically a dressing gown or a robe.

Rather than research it all myself, I e-mailed dear Liz Clark and she gave me some fast tips.  I hope she doesn't mind me posting them here so they don't get lost in all my e-mails -- plus, they may benefit you!

"Wrappers for wrapper-use are generally done in wools, with wool or silk facings [doesn't this make you think of a fancy robe?]. But wrappers for maternity use are done in normal dress fabrics (including cotton prints), and look pretty much like dresses, only with a loose, designed-to-be-belted front. So, they're two different creatures."

and Liz also explained 2 other maternity options:

1.  ". . .making a normal dress with a larger waist, and running some drawing cords inside the waistband in front. . ."

2.  "You could also do a modified dress: use the fitted back and full back skirts, and the upper part of your bodice pattern to create a fitted yoke. Then cut the lower half of the front armscye into a long rectangle of fabric, and gather the rest of the upper edge to fit the yokes, then finish off the front with a placket that goes down into the skirt area. Add a self-fabric belt in the side seams (with multiple hooks for expansion), sew the side seams, and you have a yoked-front, loose-front gown with a fitted, full-skirted back and endless bump expansion. Works best with slighter busts, but it makes a dress that's very versatile all through pregnancy, still looks nice from the back, and accommodates nursing, too."

I really, really liked that 2nd option, but just didn't have time to figure it all out.

As I was sewing I ran across some fun pictures of work from others.

These looked more like robe/dressing-gown wrappers to me:
(the inspiration for the above dress:)


And these looked more maternity-ish:

This one is my very, very favorite.

and

So, with that, I was off to build my own.


Tuesday, April 26, 2011

Three looks in one!

I'd read in Liz Clark's Dressmaker's Guide how to make a pattern for a bodice.  Now this was a FUN project!!  It didn't take nearly as long or was as hard as I thought it would be!

If you want to do it right, though, you make your corset first, and draft your pattern over that. Since this is my work dress, and I'm not about to wear a corset to work in a garden, I just wore my normal under clothing.  When my body is done changing sizes all the time, I'll draft a nice corset, a new bodice, and make a lovely NEW dress.


The finished product, without petticoats.
It's a little short because this bodice does not have a waistband.  
I'm not sure if I'm going to lengthen it for now, though.
I didn't add the princess lines or tucks in the back just to give me more wiggle room.
 
I couldn't get a good picture here with my petticoats on, but you can see that the shape 
is much better with the petticoats than without!

Here are a few pictures from all our fun!

Not my most modest picture, but here you can see the idea of how making the pattern works.


My super-mom who did the wrapping and marking.


This fabric has gone a long way!  This is now my 4th top  and second skirt in this fabric.  I sold one complete dress a couple years ago when I realized I'd just made it too big for me.  Great options for my changing sizes!


Thursday, May 27, 2010

Pioneer Bonnet Tutorial


Here's a bonnet pattern (guidelines/instructions/tutorial) that I made up after making several bonnets using patterns in my earlier days of re-enacting. What I really wanted was instructions on how to craft my own bonnet without needing a physical pattern. So, if you want an authentic pattern, look elsewhere, but if you want something that will work, and where you don't need to go buy a pattern, give this a try.

If you are going for authentic, here are some better options:  

Easiest: Elizabeth Stewart Clark's slat bonnet. 

Easy: Sarah Jane's Victorian Sunbonnet (with multi-sizes here) (and pdf of her tutorials here).  


Slightly more tricky, but do-able: Godey's Lady's Book 1857 Sun Bonnet (with more sizes here).


Materials
1. Fabric: Up to a yard of 45” fabric (see sizing and layout below)
2. Elastic: 7 – 9” of ¼”
3. Interfacing: equal size of one brim piece (see layout below)

Sizing and Layout
[IMPORTANT!]. I'm finding that if you measure your head and subtract two inches for the measurement for your main square, that measurement is a good size for your bonnet.
. For 16" bonnets, use 6" elastic.
. For 17-19" bonnets, use 7" elastic.
. For 20" bonnets, use 8" elastic.

. A 19" square seems to work well for 19.5" - 20.5" heads.
. My friend's girl has a 19" head and she looked great in an 18" bonnet.
. My baby has a 17" head, and a 16" bonnet is just a tiny bit big.
. My head is 22", and a 20" square looked good.
· For a baby doll a 9” starting square works well (see layout below).


(Please note:  There are two brim pieces.  One is for the outside of the bonnet, and the other is for the lining.  The ties sandwich between the two brim pieces.)

1. Cut a square of fabric. In this example, we’ll use a 20" square.
2. For the brim depth, use ¼ (or slightly less) the bonnet length plus the bonnet length for the length of the brim: 5” x 20”.
3. For the ties, cut 2 strips 3” x 30”. (The length may be a little long (especially for kids), so hold the strip up to your jaw to see how long it falls and shorten as necessary.)

Cutting

1. Fold the bonnet piece in half, and then in quarters (to make a 10” x 10” square). Press to mark a plus sign in the fabric. Unfold the fabric one time so it is still in half (see drawing).

a. Cut a quarter circle off the top half of the folded fabric. Look at the pictures below to see how you can fold the fabric to make a nice cut. I learned that from The Workwoman's Guide!


(Don't mind the bottom of these pictures, for some reason, when I upload, it looks like the picture has gone through a bad photo-copier.)

b. Cut a ½” deep mark 1/5 the way up from the bottom of the fabric: in this case, 4”. Cut another small mark ¼” deep 1” above the first mark. Sorry, I forgot to take a picture of this!

(You will be folding the top mark down to meet the bottom mark to form casing for the elastic. You actually may need to cut 1 ¼” above the lower mark to create enough room for feeding your elastic – depending on how big your safety pin is.)

c. Mark the top center of the bonnet piece with either a pin or a ¼” snip.


2. Take one brim piece and fold in half two times to end up with a 5” x 5” square. Press to create lines. Unfold once.

a. Cut a quarter circle off the top half. Cut the second brim piece to match.


b. Cut a piece of interfacing to match your brim.

Sewing


1. Below the bottom slit marks on both sides of the bonnet, fold the fabric in ¼”, then again ¼”. Press. Stitch.


a. Fold up the bottom edge ¼”, then again ¼”. Press. Stitch.


b. To make casing, fold top slits down to meet bottom slits in a “Z” shaped fashion. Press. Stitch bottom and top of casing (leaving ends open).


c. Cut a 7” piece of elastic and feed through casing. Be sure and stitch ends down.


2. Take one brim piece and fuse or sew interfacing to wrong side.


a. Take other brim piece and fold straight edge ½” to the back (wrong side). Press.
b. Stitch the two brim pieces right sides together along the curved edge with a 1/2 “ seam. Trim to ¼”. Clip and notch curves. Turn. Press.


(Sorry! I put my interfacing on the wrong side in the picture!)

c. Mark with a ¼” deep clip the center of the straight edge of the brim (or use a pin).

3. Fold ties in half lengthwise. Stitch a ½” seam from one short edge then across the long edge, leaving one small end open for turning. Clip corner. Turn. Press.  (Another option is to press both long sides of the tie in 1/4-1/2" as well as one end.  Fold the whole thing in half the long way and press.  Top stitch the short, pressed-under edge as well as the long edge.  This is a good way to go if you don't want to turn your ties!)


a. Baste ties to inside (wrong side) of bonnet by matching small, open end to notched corner (on top of casing, not below it).  (Also, if the tie seems too wide where you baste it on, put a little pleat in the tie -- like a little "z" fold right in the center of the narrow part of the tie -- to narrow it down to the desired size; then just baste over the tie as previously indicated (shown in picture).)

4. Run two rows of gathering stitches from one side just above the tie around to the other side just above the tie. Gather bonnet all the way around.


5. Pin straight edge of brim (unfolded piece) to bonnet, right sides together matching centers and brim ends with notched ends of bonnet. Baste with a ½ inch seam, being careful not to catch the second piece of brim (the one that was turned ½” down). Stitch, ½”.


6. Turn bonnet inside out and hand stitch folded brim piece to inside of bonnet to finish, making sure unfinished edge is tucked inside the brim.  (You may also machine stitch this if you are very careful! I find I do better hand stitching this part.)


For a (printable) PDF of this tutorial, click here.

The Idea Door also has a few links to patterns. One link doesn't work anymore, another goes to Mother Earth News (but there are no pictures), and I did try the last link entitled Women's Pioneer Bonnet (.pdf), but can't remember why I never finished that one.

I tried this pattern also, but it turned out kind of funny.

You know, had I known that on-line patterns were called tutorials when I made this pattern, I would have just Googled for a bonnet tutorial like this one from Given Moments in the first place. Here's another tutorial from Pickup Some Creativity.

10/2/10:  http://tipnut.com/sunbonnet-pattern/ 

4/5/11:  http://romantichistoryclothing.blogspot.com/2009/12/little-house-on-prairie-sunbonnet.html


Hey! If you try my pattern, let me know how it goes! I'd love to know what sizes of fabric work for what size of head.


LinkWithin

Related Posts with Thumbnails